Professional Standards
Staff > Professional Standards
Use this page to add multiple staff members to each class roster. Classes can also be tracked on each individual staff member. Note: the Course must be created in Configuration prior to adding the class record.
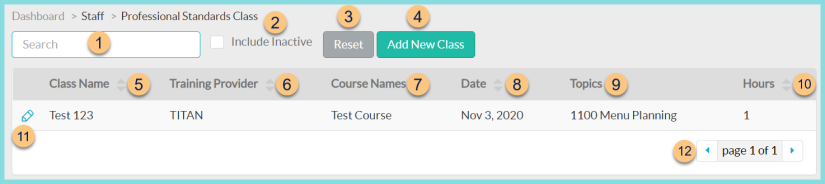
Professional Standards Screen
-
Search - search by class name, training provider, or course name
-
Include Inactive - check to include inactivated classes in results
-
Reset - click to reset search parameters
-
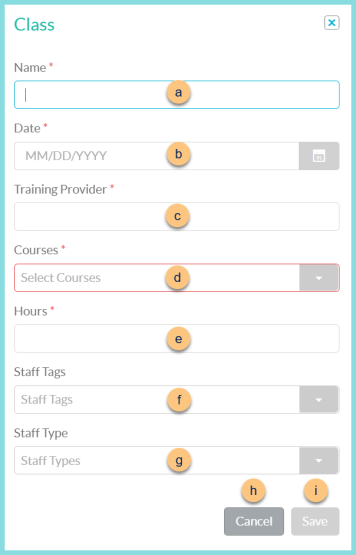
Add New Class - click to add a new class record
-
Name - enter class name
-
Date - enter class date
-
Training Provider - enter training provider name
-
Courses - select course(s) covered by class
-
Hours - notice the calculated hours based on the selected course(s). Modify if needed.
-
Staff Tags - select staff tag(s) or All to pre-populate staff to the class roster
-
Staff Type - select staff type(s) or All to pre-populate staff to the class roster
-
Cancel - click to return to the previous screen without creating a new class
-
Save - click to create the class and be redirected to the individual class screen
-
Class Name - click to sort by class name
-
Training Provider - click to sort by training provider
-
Course Names - notice course name(s)
-
Date - click to sort by class date
-
Topics - notice course topic(s)
-
Hours - click to sort by class hours
-
Pencil - click to be redirected to the individual class screen
-
< > - click to scroll through pages
Individual Class Screen

-
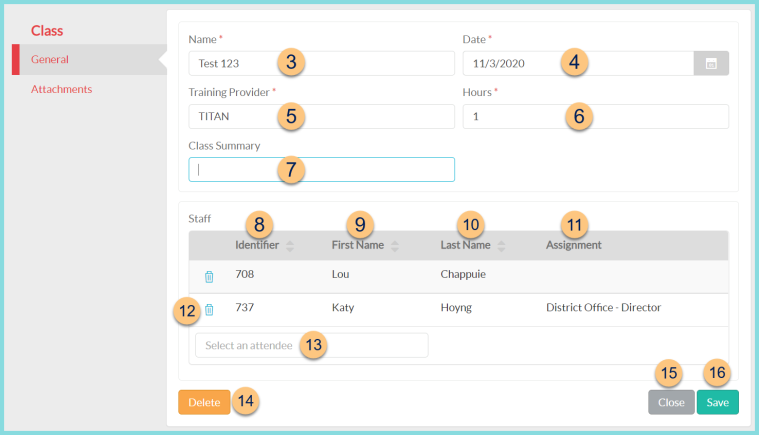
Notice the Class Name, Course Name, Category, and Subject(s)
-
Print Class Roster Report - click to generate a copy of the Professional Standards Class Roster Data Report for this class
General Tab
-
Name - change the class name if needed
-
Date - change the class date if needed
-
Training Provider - change the training provider name if needed
-
Hours - change the hours of credit if needed
-
Class Summary (optional) - enter a summary of the class
-
Identifier - click to sort by staff identifier
-
First Name - click to sort by staff first name
-
Last Name - click to sort by staff last name
-
Assignment - notice the staff member's assigned building and staff type
-
Select an attendee - search by staff name or identifier to add staff to the class
-
Delete - click to delete the class
-
Close - click to close the class and return to the previous screen
-
Save - click to save changes
Attachments Tab
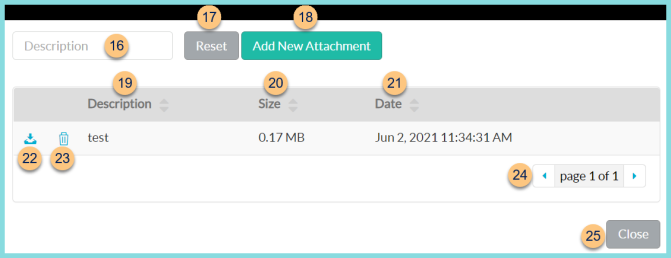
Documents can be attached to this page as a reference.
-
Description - search by attachment description
-
Reset - click to reset search parameters
-
Add New Attachment - click to add a new attachment
-
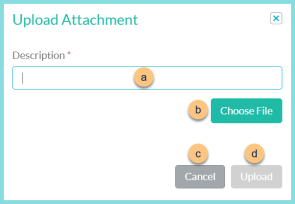
Description - enter attachment name
-
Choose File - click to choose a file from the user's computer to attach
-
Cancel - click to return to the previous screen without adding the attachment
-
Upload - click to upload the attachment
-
Description - click to sort by attachment description
-
Size - click to sort by attachment size
-
Date - click to sort by attachment upload date and time
-
Download icon - click to download a copy of the attachment
-
Trash Can icon - click to delete the attachment
-
< > - click to scroll through pages
-
Close - click to return to the professional standards search screen